


If you ask me what's the best way to learn AI Agents in 2026, I will tell you it is definitely by building them yourself from scratch. That's not only important for learning purposes, but if you're going to build a production-grade AI agent that needs to be highly efficient, personalized and robust, then building one from scratch is your best option. For instance, all of the coding agents you can find (e.g., Claude Code, Codex, Cursor, etc.) are built with custom architectures specific to their products.
Now don't get me wrong, frameworks like LangChain, LangGraph, and LlamaIndex can also be useful for standard tasks, like RAG or automated workflows. The point is that you need to be aware of the capabilities and limitations of any library before you decide to use it on a real complex task.
I still use LangGraph a lot, but mostly in prototyping. It is really great for creating a demo, or for teaching design patterns and agentic architectures.
In this and the next post, I'll show you how to build step-by-step an AI agent with essential capabilities and a few advanced ones. I'll also show you how to implement some design patterns that can come in handy in many cases.
You can find the complete code in this Colab notebook and experiment with it yourself.
What is an AI Agent, Really?
There are numerous types of AI Agents, and you can find them everywhere these days. What used to be simple chatbots, like ChatGPT, are now AI Agents that have tools at their disposal — web search, reasoning capabilities, image generation, and more. The complexity of the agent depends on the goals it needs to achieve.
For example, a customer support agent that assists website visitors can simply be a chatbot with a RAG tool for accurate, up-to-date responses, and another tool that automatically drafts an email to the human support team whenever it can't find a reliable answer or when the inquiry requires human intervention.
At its core, an AI agent is a system that can:
- Perceive its environment (understand user input)
- Reason about what actions to take
- Act by using tools or providing responses
- Learn from the outcomes (we'll cover this in Part 2)
Today, we're building a foundational agent that implements the first three capabilities using the ReAct (Reasoning + Acting) pattern.
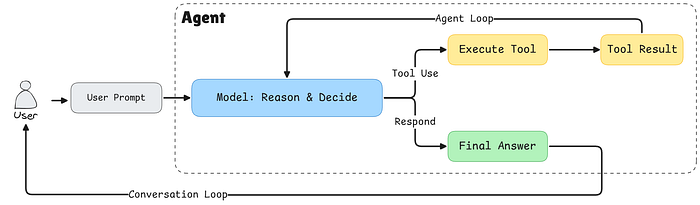
Architecture Overview
Before we get to the coding part, let's understand how our agent is structured. We're building three main components:
- Tool System: A flexible registry that manages all available tools
- LLM Wrapper: An abstraction layer for interacting with language models
- Agent Orchestrator: The brain that coordinates everything
Here's why this separation matters:
Tool Abstraction: By creating a tool registry, we can easily add new capabilities to our agent without modifying core logic. Need a database query function? Just register a new tool. This is the extensibility principle in action, and it is used in every agent that you could think of.
LLM/Agent Separation: This is crucial for production systems. The agent is the orchestrator, it manages the conversation flow, decides when to call tools, and handles the overall workflow. The LLM is just one component that provides reasoning, it's like the brain of the agent, but in this case we need to be able to easily swap brains whenever we want.
So, by decoupling them:
- You can swap between different LLM providers (Gemini, OpenAI, Claude) without rewriting agent logic.
- You can implement fallback strategies if one provider fails.
- You can optimize costs by using different models for different tasks.
- Testing becomes easier since you can mock the LLM independently.
Step 1: Building the Tool System
Let's start with the foundation, our tool system. Tools are the hands and feet of our agent, allowing it to interact with the outside world.
The Tool Class
First, we need a way to represent individual tools:
from typing import Dict, List, Callable, Any

class Tool:
    def __init__(
        self,
        name: str,
        description: str,
        input_schema: Dict[str, Any],
        output_schema: Dict[str, Any],
        func: Callable[..., Any],
    ):
        self.name = name
        self.description = description
        self.input_schema = input_schema
        self.output_schema = output_schema
        self.func = func
    def __call__(self, **kwargs):
        return self.func(**kwargs)
Each tool has five key components:
- name: A unique identifier
- description: What the tool does (crucial for the LLM to understand when to use it)
- input_schema: Defines what parameters the tool expects
- output_schema: What the tool returns
- func: The actual function that does the work
The __call__ method makes our Tool instances callable, so we can use them like regular functions: tool(a=5, b=3).
The Tool Registry
Now we need a central place to manage all our tools.
from typing import Union, Literal
from pydantic import BaseModel

class ToolRegistry:
    def __init__(self):
        self.tools: Dict[str, Tool] = {}
    def register(self, tool: Tool):
        self.tools[tool.name] = tool
    def get(self, name: str) -> Tool:
        if name not in self.tools.keys():
            raise ValueError(f"Tool '{name}' not found")
        return self.tools[name]
    def list_tools(self) -> List[Dict[str, Any]]:
        return [
            {
                "name": tool.name,
                "description": tool.description,
                "input_schema": tool.input_schema.model_json_schema(),
            }
            for tool in self.tools.values()
        ]
    def get_tool_call_args_type(self) -> Union[BaseModel]:
        input_args_models = [tool.input_schema for tool in self.tools.values()]
        tool_call_args = Union[tuple(input_args_models)]
        return tool_call_args
    def get_tool_names(self) -> Literal[None]:
        return Literal[*self.tools.keys()]
The registry acts as a central catalog of all available capabilities. We use it mainly to register and retrieve tools.
The list_tools() Method: Telling the LLM What It Can Do
This method is particularly important because it generates a machine-readable description of all available tools. When we pass this to the LLM in the system prompt, it learns what capabilities it has access to. The method returns something like:
[
  {
    "name": "add",
    "description": "Add two numbers",
    "input_schema": {
      "type": "object",
      "properties": {
        "a": {"type": "integer"},
        "b": {"type": "integer"}
      },
      "required": ["a", "b"]
    }
  },
  {
    "name": "multiply",
    "description": "Multiply two numbers",
    "input_schema": {...}
  }
]
This JSON schema tells the LLM exactly how to call each tool. Without this, the LLM might hallucinate tool names that don't exist or provide arguments in the wrong format.
The get_tool_call_args_type() Method: Runtime Validation
This method creates a Union type of all possible tool argument schemas. In Python typing, a Union means "one of these types." So if you have two tools, it creates: Union[ToolAddArgs, ToolMultiplyArgs].
Why does this matter? When the LLM responds with a tool call, Pydantic will validate that the arguments match one of these schemas. If the LLM tries to pass {"a": "five", "b": 3} (a string instead of an integer), Pydantic will catch it before the tool even executes. This prevents runtime errors and provides clear feedback.
Note: We are using Pydantic here as it is becoming the standard for handling tool calls and structured output for LLM APIs. However, if you want to use simple JSON format, you can easily convert Pydantic models to JSON.
The get_tool_names() Method: Preventing Hallucinations
This method generates a Literal type containing only valid tool names: Literal["add", "multiply"]. This is a powerful constraint, the LLM can only return tool names that actually exist in the registry.
Without this, an LLM might confidently call a tool named "divide" that you never created. With structured outputs and Literal types, the LLM is forced to choose from the allowed set. If it tries to use an invalid name, the API will reject the response and force the model to try again with a valid tool name.
Together, these three methods create a robust type-safety system that bridges the gap between the probabilistic world of LLMs and the deterministic world of Python code. They turn vague requests into validated, executable function calls.
Let's now see how to use the tool abstraction class and registry to create and register new tools.
Registering Our First Tools
Let's create two simple tools to demonstrate the system:
def add(a: int, b: int) -> int:
    return a + b

def multiply(a: int, b: int) -> int:
    return a * b
These are the tool functions that will be called during execution.
Now here's where Pydantic comes in. We define schemas for each tool's inputs:
class ToolAddArgs(BaseModel):
    a: int
    b: int

class ToolMultiplyArgs(BaseModel):
    a: int
    b: int
Then we instantiate out tool registry and add our newly created tools.
registry = ToolRegistry()

registry.register(
    Tool(
        name="add",
        description="Add two numbers",
        input_schema=ToolAddArgs,
        output_schema={"result": "int"},
        func=add,
    )
)
registry.register(
    Tool(
        name="multiply",
        description="Multiply two numbers",
        input_schema=ToolMultiplyArgs,
        output_schema={"result": "int"},
        func=multiply,
    )
)
Step 2: Type Safety with Pydantic
You might wonder: "Why use Pydantic instead of plain dictionaries, or JSON?" Great question. This is about structured outputs and type safety.
When working with LLMs, one of the biggest challenges is ensuring they return data in a format your code can reliably process. Even though today, in 2026, we have reliable LLM that's are heavily trained on using tools, but hallucination is still an unsolved problem. That's why we need type and structure validation.
Pydantic models act as contracts. They:
- Validate incoming data automatically.
- Provide clear error messages when data is invalid.
- Enable IDE autocomplete for better developer experience.
- Generate JSON schemas that modern LLMs can use for structured output.
Let's define the possible actions our agent can take:
# Get type-safe tool names and arguments
ToolNameLiteral = registry.get_tool_names()
ToolArgsUnion = registry.get_tool_call_args_type()

class ToolCall(BaseModel):
    action: Literal["tool"]
    thought: str
    tool_name: ToolNameLiteral
    args: ToolArgsUnion
class FinalAnswer(BaseModel):
    action: Literal["final"]
    answer: str
LLMResponse = Union[ToolCall, FinalAnswer]
This structure enforces the ReAct pattern. The LLM must:
- Choose an action type ("tool" or "final")
- If calling a tool: provide a thought process, tool name, and valid arguments
- If giving a final answer: provide the answer text
The ToolNameLiteral ensures the LLM can only call tools that actually exist. The ToolArgsUnion ensures arguments match the expected schema for whichever tool is being called.
Step 3: The LLM Wrapper
Now we integrate with Google's Gemini API. I always prefer to use Gemini in tutorials as it provides a free tier API for you to use. But you can use other API service providers, and all you need to do is modify this class according to the API documentation.
import json
from google import genai
from google.genai import types

class GeminiLLM:
    def __init__(self, client, tool_registry, model="gemini-2.5-flash"):
        self.client = client
        self.model = model
        self.tool_registry = tool_registry
        self.system_instruction = self._create_system_instruction()
The System Prompt
The system prompt is where we teach our agent how to behave. Here we use a simple system prompt, but in real products, it can get be much more detailed. This is one of the most critical pieces:
def _create_system_instruction(self) -> str:
    tools_description = json.dumps(
        self.tool_registry.list_tools(),
        indent=2
    )

    system_prompt = """
You are a conversational AI agent that can interact with external tools.
CRITICAL RULES (MUST FOLLOW):
- You are NOT allowed to perform operations internally that could be performed by an available tool.
- If a tool exists that can perform any part of the task, you MUST use that tool.
- You MUST NOT skip tools, even for simple or obvious steps.
- You MUST NOT combine multiple operations into a single step unless a tool explicitly supports it.
- You may ONLY produce a final answer when no available tool can further advance the task.
TOOL USAGE RULES:
- Each tool call must perform exactly ONE meaningful operation.
- If the task requires multiple operations, you MUST call tools sequentially.
- If multiple tools could apply, choose the most specific one.
RESPONSE FORMAT (STRICT):
- You MUST respond ONLY in valid JSON.
- Never include explanations outside JSON.
- You must choose exactly one action per response.
Tool call format:
{
  "action": "tool",
  "thought": "...",
  "tool_name": "...",
  "inputs": { ... }
}
Final answer format:
{
  "action": "final",
  "answer": "..."
}""" + "\\n\\nAvailable tools with description:\\n" + tools_description
    return system_prompt
Why are these rules so strict?
LLMs are trained to be helpful and will often try to "help" by doing math or reasoning internally. But we want our agent to be observable and reliable. By forcing it to use tools for every operation:
- We can log and debug each step
- We can swap tool implementations without changing the agent
- We can test tools independently
- We maintain a clear audit trail of actions
This is the essence of the ReAct pattern: explicit reasoning ("thought") followed by explicit actions ("tool_name" + "args").
Formatting Chat History for Gemini
Different LLM providers expect different message formats. Here's how we convert our generic history to Gemini's format:
def _format_gemini_chat_history(self, history: list[dict]) -> list:
    formatted_history = []
    for message in history:
        if message["role"] == "user":
            formatted_history.append(types.Content(
                    role="user",
                    parts=[
                        types.Part.from_text(text=message["content"])
                    ]
                )
            )
        if message["role"] == "assistant":
            formatted_history.append(types.Content(
                    role="model",
                    parts=[
                        types.Part.from_text(text=message["content"])
                    ]
                )
            )
        if message["role"] == "tool":
            formatted_history.append(types.Content(
                    role="tool",
                    parts=[
                        types.Part.from_function_response(
                            name=message["tool_name"],
                            response={'result': message["tool_response"]},
                        )
                    ]
                )
            )
    return formatted_history
This abstraction is key. Our agent works with a simple, provider-agnostic message format. Each LLM wrapper handles its own formatting quirks.
Generating Responses with Structured Output
Finally, we call the LLM with structured output enabled:
def generate(self, history: list[dict]) -> str:
    gemini_history_format = self._format_gemini_chat_history(history)
    response = self.client.models.generate_content(
        model=self.model,
        contents=gemini_history_format,
        config=types.GenerateContentConfig(
            temperature=0,
            response_mime_type="application/json",
            response_schema=LLMResponse,
            system_instruction=self.system_instruction,
            automatic_function_calling=types.AutomaticFunctionCallingConfig(disable=True)
        ),
    )
    return response.text
Key parameters:
- temperature=0: We want deterministic, consistent behavior
- response_mime_type="application/json": Forces JSON output
- response_schema=LLMResponse: Uses our Pydantic models for validation
- automatic_function_calling disabled: We want manual control over tool execution
Step 4: The Agent Orchestrator
Now we bring it all together. The agent is the orchestrator that manages the conversation loop:
class Agent:
    def __init__(self, llm, tool_registry, max_steps=5):
        self.llm = llm
        self.tool_registry = tool_registry
        self.history = []
        self.max_steps = max_steps
The max_steps parameter prevents infinite loops, a safety mechanism for when the agent gets stuck.
The ReAct Loop
Here's where the magic happens:
def run(self, user_input: str):
    self.history.append({"role": "user", "content": user_input})
    for step in range(self.max_steps):
        # Get LLM decision
        llm_output = self.llm.generate(self.history)
        action = json.loads(llm_output)
        if action["action"] == "tool":
            # Record the thought process
            self.history.append(
                {"role": "assistant", "content": llm_output}
            )
            # Execute the tool
            tool = self.tool_registry.get(action["tool_name"])
            result = tool(**action["args"])
            # Record the result
            observation = f"Tool {tool.name} returned: {result}"
            self.history.append(
                {"role": "tool", "tool_name": tool.name, "tool_response": result}
            )
            continue
        if action["action"] == "final":
            self.history.append(
                {"role": "assistant", "content": llm_output}
            )
            return action["answer"]
    raise RuntimeError("Agent did not terminate within max_steps")
Let's break down this loop:
- User input is added to history: The agent needs context
- LLM generates a decision: Based on the entire conversation
- If it's a tool call: - Record the decision (the "thought") - Execute the tool - Record the result (the "observation") - Continue to next iteration
- If it's a final answer: We're done!
- Safety check: If we hit max_steps, raise an error
Step 5: Putting It All Together
Let's initialize everything and create a chat interface:
from google import genai

# Initialize the client (you'll need your API key)
client = genai.Client(api_key=GEMINI_API_KEY)
# Create LLM and Agent
llm = GeminiLLM(client, registry)
agent = Agent(llm, registry)
def chat_with_agent(agent: Agent):
    print("Welcome! Type 'exit' to quit.\\n")
    while True:
        user_input = input("You: ")
        if user_input.lower() in ["exit", "quit", "q"]:
            print("Goodbye!")
            break
        try:
            response = agent.run(user_input)
            print(f"Agent: {response}")
        except RuntimeError as e:
            print(f"Agent error: {e}")
        except Exception as e:
            print(f"Unexpected error: {e}")
# Start chatting
chat_with_agent(agent)
Example: Seeing the Agent in Action
Let's see what happens when you ask: "What is 5 plus 3, then multiply the result by 2?"
Step 1: LLM receives the question and responds:
{
  "action": "tool",
  "thought": "I need to first add 5 and 3",
  "tool_name": "add",
  "args": {"a": 5, "b": 3}
}
Step 2: Agent executes add(5, 3) → returns 8
Step 3: LLM sees the result and responds:
{
  "action": "tool",
  "thought": "Now I need to multiply 8 by 2",
  "tool_name": "multiply",
  "args": {"a": 8, "b": 2}
}
Step 4: Agent executes multiply(8, 2) → returns 16
Step 5: LLM responds:
{
  "action": "final",
  "answer": "The result is 16"
}
Notice how the agent broke down the task into discrete steps, used tools for each operation, and provided a clear explanation. This transparency is what makes AI agents debuggable and trustworthy.
Why This Architecture Matters
You might be thinking: "This seems like a lot of boilerplate for a simple calculator." And you'd be right! But here's why this foundation is powerful:
1. Extensibility
Want to add a weather API? Just create the function and register it:
class WeatherArgs(BaseModel):
    city: str

def get_weather(city: str) -> str:
    # API call here
    return f"Weather in {city}: Sunny, 72°F"
registry.register(Tool(
    name="get_weather",
    description="Get current weather for a city",
    input_schema=WeatherArgs,
    output_schema={"weather": "str"},
    func=get_weather
))
No changes to the agent logic needed. The LLM automatically learns about the new tool from the system prompt.
2. Provider Flexibility
Need to switch from Gemini to OpenAI? Create an OpenAILLM class that implements the same interface:
class OpenAILLM:
    def __init__(self, client, tool_registry, model="gpt-4"):
        # Similar structure, different API calls
        pass
    def generate(self, history: list[dict]) -> str:
            # OpenAI-specific implementation
            pass
# Swap it in
llm = OpenAILLM(openai_client, registry)
agent = Agent(llm, registry)  # Everything else stays the same!
3. Testability
You can test each component independently:
- Test tools in isolation
- Mock the LLM for agent logic testing
- Verify the entire flow end-to-end
4. Observability
Every step is recorded in the history. You can:
- Log all tool calls for debugging
- Analyze which tools are used most
- Identify where the agent struggles
- Build analytics dashboards
What We've Built
In this post, we've created a foundational AI agent with:
- Modular tool system.
- Type-safe structured outputs.
- Provider-agnostic LLM integration.
- ReAct reasoning pattern.
- Clear separation of concerns.
But this is just the beginning. Our agent is stateless (no memory between conversations), has no human oversight, and provides limited observability.
What's Next: Part 2
In the next post, we'll level up this agent with production-grade features:
- Long-term Memory: Using vector databases to remember past conversations and learn from interactions
- Human-in-the-Loop (HITL): Pausing for human approval on critical actions
- Advanced Observability: Logging, tracing, and monitoring.
- Error Recovery: Handling tool failures gracefully and implementing retry logic
These features are essential for a production system.
Continue Reading Part 2
Try It Yourself
The best way to learn is by building. Take this code and:
- Add your own tools (APIs, database queries, file operations)
- Experiment with different system prompts
- Try different LLM providers
- Break it and see what happens!
You can find the complete code in this Colab notebook to experiment immediately.
If you're building with LLMs, the Master LLMs series is here to guide you from fundamentals to production-ready systems. Read the full series to go deeper into what makes these models tick and how to wield them effectively.

Leave a comment and follow me for more insights on AI, ML, and coding. You can also check out my work and socials: Website | YouTube | GitHub | LinkedIn | X
🚀 I'm launching a curated weekly AI newsletter, and you're invited to be among the first. 👉No hype. No noise. Just essential news, tools, papers, and insights handpicked for engineers and thinkers who build with AI.
Be part of the founding circle → Join free now