

🫶 Quick thing before we dive in: If this article helps you even a little, tapping that 👏 button (you can hit it up to 50 times!) helps it reach more iOS devs. It's a small gesture that makes a big difference. Thanks!
🏗️ What is MVI Architecture?
Let me be honest with you — when I first heard about MVI (Model-View-Intent) architecture, I thought it was just another buzzword in the endless parade of iOS architectural patterns. MVVM was working fine, right? Why complicate things?
But here's the thing… as your SwiftUI apps grow beyond simple screens, you start running into problems. State scattered across multiple @StateObjects, complex binding chains that make your head spin, and debugging sessions where you can't figure out why your UI is in some weird state. Sound familiar?
MVI offers a different approach — one that's becoming increasingly popular in the iOS community, especially for complex applications that need predictable state management.
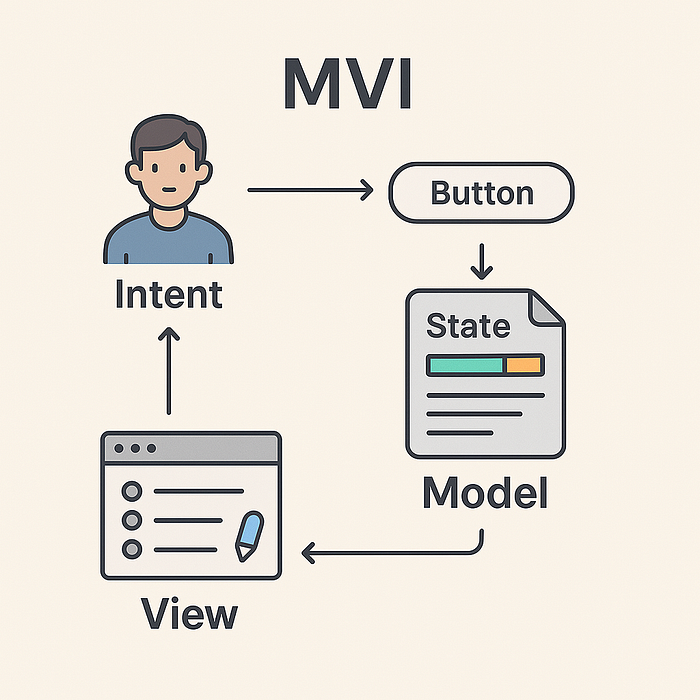
What Exactly is MVI?
MVI stands for Model-View-Intent, and it's all about creating a unidirectional data flow in your application. Think of it as a circle where data flows in only one direction:
- User performs an action (Intent)
- Intent updates the Model (State)
- View reacts to Model changes
- Back to step 1
No shortcuts, no backdoors, no "quick fixes" that bypass the flow.
The Three Pillars
Model — This isn't your data model like User or Product. In MVI, the Model represents the entire state of your feature or screen. It's a single source of truth that describes everything your UI needs to know.
View — Your SwiftUI views become pure presentation layers. They don't manage state, they don't make decisions — they just display what the Model tells them and forward user actions as Intents.
Intent — These represent user actions and their intentions. Tapping a button, entering text, pulling to refresh — these all become Intents that flow through your system.
How's This Different from MVVM?
In MVVM, you might have something like this:
// Traditional MVVM approach
@StateObject private var viewModel = TodoViewModel()

Button("Add Todo") {
    viewModel.addTodo(title) // Direct method call
}
With MVI, the same interaction becomes:
// MVI approach
Button("Add Todo") {
    store.send(.addTodo(title)) // Send an intent
}
The difference might seem subtle, but it's profound. In MVVM, your view talks directly to the ViewModel. In MVI, everything goes through the intent system, creating a predictable, traceable flow.
Why Unidirectional Matters
Picture this: you're debugging a complex screen where the save button sometimes stays disabled even when all fields are filled. In traditional patterns, that state could be coming from anywhere — multiple ViewModels, direct view state, binding chains, side effects…
With MVI's unidirectional flow, you can trace exactly what happened:
- User filled the last field →
fieldChangedintent - Intent updated the model with new field value
- Model recalculated
canSaveproperty - View received new state and updated button
One path, predictable flow, easier debugging.
Ready to dive deeper into how these components actually work together? Let's break down each piece in the next section.
🔍 Understanding the Components
Now that we've got the big picture, let's break down each component and see how they actually work in practice. I'll be honest — when I first tried to implement MVI, I kept trying to force my MVVM thinking into it. Big mistake. Each component has a very specific role, and understanding that is crucial.
The Model: Your Single Source of Truth
In MVI, the Model isn't a single object — it's the complete state of your feature. Think of it as a snapshot of everything your UI needs to know at any given moment.
struct TodoState {
    var todos: [Todo] = []
    var isLoading: Bool = false
    var errorMessage: String? = nil
    var newTodoText: String = ""
    var filter: TodoFilter = .all

    // Computed properties for derived state
    var filteredTodos: [Todo] {
        switch filter {
        case .all: return todos
        case .completed: return todos.filter(\.isCompleted)
        case .pending: return todos.filter { !$0.isCompleted }
        }
    }

    var canAddTodo: Bool {
        !newTodoText.isEmpty && !isLoading
    }
}
See what's happening here? Everything the UI needs is in one place. No scattered state, no "where did I put that loading flag?" moments. The state is immutable — you never modify it directly, you create new versions of it.
Intents: The Language of User Actions
Intents represent every possible thing a user can do in your feature. They're like a contract between your UI and your business logic.
enum TodoIntent {
    case loadTodos
    case addTodo(String)
    case toggleTodo(UUID)
    case deleteTodo(UUID)
    case updateNewTodoText(String)
    case changeFilter(TodoFilter)
    case clearError
}
Here's what I love about this approach — just by looking at your intents, you know exactly what your feature can do. No hidden methods, no surprise side effects. It's like documentation that can't get out of sync.
The View: Pure and Simple
Your SwiftUI views become incredibly simple. They observe the state and send intents. That's it.
struct TodoView: View {
    @StateObject private var store = TodoStore()

    var body: some View {
        VStack {
            if store.state.isLoading {
                ProgressView("Loading todos...")
            } else {
                todoList
                addTodoSection
            }
        }
        .onAppear {
            store.send(.loadTodos)
        }
    }

    private var todoList: some View {
        List(store.state.filteredTodos) { todo in
            TodoRow(todo: todo) {
                store.send(.toggleTodo(todo.id))
            }
        }
    }

    private var addTodoSection: some View {
        HStack {
            TextField("New todo", text: .constant(store.state.newTodoText))
                .onChange(of: store.state.newTodoText) { _, newValue in
                    store.send(.updateNewTodoText(newValue))
                }

            Button("Add") {
                store.send(.addTodo(store.state.newTodoText))
            }
            .disabled(!store.state.canAddTodo)
        }
    }
}
Notice how the view doesn't make any decisions? It just displays state and forwards intents. All the logic lives elsewhere.
The Store: Where the Magic Happens
The Store is where your intents get processed and your state gets updated. It's the brain of your MVI setup.
@MainActor
class TodoStore: ObservableObject {
    @Published private(set) var state = TodoState()

    func send(_ intent: TodoIntent) {
        switch intent {
        case .loadTodos:
            handleLoadTodos()

        case .addTodo(let text):
            handleAddTodo(text)

        case .toggleTodo(let id):
            handleToggleTodo(id)

        case .updateNewTodoText(let text):
            state = TodoState(
                todos: state.todos,
                isLoading: state.isLoading,
                errorMessage: state.errorMessage,
                newTodoText: text,
                filter: state.filter
            )

        // ... other cases
        }
    }

    private func handleLoadTodos() {
        state = state.copy(isLoading: true, errorMessage: nil)

        Task {
            do {
                let todos = try await TodoService.shared.fetchTodos()
                state = state.copy(todos: todos, isLoading: false)
            } catch {
                state = state.copy(isLoading: false, errorMessage: error.localizedDescription)
            }
        }
    }
}
The Store receives intents, decides what to do with them, and creates new state. Every state change is intentional and traceable.
The Flow in Action
Let's trace through what happens when a user taps "Add Todo":
- View sends
addTodo("Buy milk")intent - Store receives the intent in its
send()method - Store processes the intent, maybe calls an API
- Store creates new state with the added todo
- View automatically re-renders because it's observing the state
One direction, no shortcuts, completely predictable.
The beauty is that this flow is the same whether you're adding a todo, handling an error, or managing complex async operations. The pattern stays consistent.
Ready to see how we actually build this from scratch? Next up, we'll create your first MVI setup step by step.
🎥 Watch the Video Tutorial
Prefer learning by watching? I've created a comprehensive video tutorial that walks through this entire implementation:
▶️ Watch on YouTube: MVI Architecture in SwiftUI — Complete Guide
The video covers everything in this article plus live code walkthroughs and practical examples. Perfect if you want to see the implementation in action!
🛠️ Building Your First MVI Setup
Alright, let's get our hands dirty and build this thing from the ground up. I'm going to walk you through creating a basic MVI architecture that you can adapt for any SwiftUI project. We'll start simple and build up the complexity.
Step 1: Define Your State
First things first — we need to define what our state looks like. For our example, let's build a simple counter app (I know, I know, but it's perfect for understanding the pattern).
struct CounterState {
    let count: Int
    let isLoading: Bool
    let lastOperation: String?

    init(count: Int = 0, isLoading: Bool = false, lastOperation: String? = nil) {
        self.count = count
        self.isLoading = isLoading
        self.lastOperation = lastOperation
    }
}

// Helper for creating new state instances
extension CounterState {
    func copy(
        count: Int? = nil,
        isLoading: Bool? = nil,
        lastOperation: String? = nil
    ) -> CounterState {
        CounterState(
            count: count ?? self.count,
            isLoading: isLoading ?? self.isLoading,
            lastOperation: lastOperation ?? self.lastOperation
        )
    }
}
Notice how everything is immutable? We never modify the state directly — we always create new instances. That copy method is a little helper that makes creating new state less verbose.
Step 2: Define Your Intents
Next, let's define all the possible actions our counter can handle:
enum CounterIntent {
    case increment
    case decrement
    case reset
    case asyncIncrement // For demonstrating async operations
    case clearLastOperation
}
These intents represent every single thing a user can do with our counter. Clean and explicit.
Step 3: Create the Store Protocol
Now here's where we set up the foundation. I like to create a protocol that all my stores conform to:
protocol MVIStore: ObservableObject {
    associatedtype State
    associatedtype Intent

    var state: State { get }
    func send(_ intent: Intent)
}
This gives us a consistent interface across all our MVI stores. Any store that conforms to this protocol will have a state and a way to send intents.
Step 4: Implement the Counter Store
Here's where the real magic happens. Our store processes intents and updates state:
@MainActor
final class CounterStore: MVIStore {
    @Published private(set) var state = CounterState()

    func send(_ intent: CounterIntent) {
        switch intent {
        case .increment:
            handleIncrement()

        case .decrement:
            handleDecrement()

        case .reset:
            handleReset()

        case .asyncIncrement:
            handleAsyncIncrement()

        case .clearLastOperation:
            handleClearLastOperation()
        }
    }

    // MARK: - Intent Handlers

    private func handleIncrement() {
        state = state.copy(
            count: state.count + 1,
            lastOperation: "Incremented to \(state.count + 1)"
        )
    }

    private func handleDecrement() {
        state = state.copy(
            count: state.count - 1,
            lastOperation: "Decremented to \(state.count - 1)"
        )
    }

    private func handleReset() {
        state = state.copy(
            count: 0,
            lastOperation: "Reset to 0"
        )
    }

    private func handleAsyncIncrement() {
        // First, show loading state
        state = state.copy(
            isLoading: true,
            lastOperation: "Processing async increment..."
        )

        // Simulate async operation
        Task {
            try await Task.sleep(nanoseconds: 1_000_000_000) // 1 second

            state = state.copy(
                count: state.count + 1,
                isLoading: false,
                lastOperation: "Async incremented to \(state.count + 1)"
            )
        }
    }

    private func handleClearLastOperation() {
        state = state.copy(lastOperation: nil)
    }
}
See how each intent has its own handler method? This keeps things organized and makes it easy to understand what each intent does. The async example shows how you handle side effects — update state to show loading, perform the async work, then update state again with the result.
Step 5: Connect to SwiftUI
Finally, let's create our view that uses this store:
struct CounterView: View {
    @StateObject private var store = CounterStore()

    var body: some View {
        VStack(spacing: 20) {
            // Display current count
            Text("\(store.state.count)")
                .font(.largeTitle)
                .fontWeight(.bold)

            // Show last operation if available
            if let lastOperation = store.state.lastOperation {
                Text(lastOperation)
                    .font(.caption)
                    .foregroundColor(.secondary)
                    .onTapGesture {
                        store.send(.clearLastOperation)
                    }
            }

            // Action buttons
            HStack(spacing: 15) {
                Button("-") {
                    store.send(.decrement)
                }
                .buttonStyle(.bordered)

                Button("+") {
                    store.send(.increment)
                }
                .buttonStyle(.bordered)

                Button("Reset") {
                    store.send(.reset)
                }
                .buttonStyle(.bordered)
            }

            // Async increment button with loading state
            Button(action: {
                store.send(.asyncIncrement)
            }) {
                HStack {
                    if store.state.isLoading {
                        ProgressView()
                            .scaleEffect(0.8)
                    }
                    Text("Async +1")
                }
            }
            .disabled(store.state.isLoading)
            .buttonStyle(.borderedProminent)
        }
        .padding()
    }
}
Look at how clean this view is! It just displays state and sends intents. No business logic, no state management — just pure presentation.
The Complete Flow
Let's trace what happens when you tap the "+" button:
- User taps "+" → View sends
.incrementintent - Store receives intent in
send()method - Store calls
handleIncrement() - Handler creates new state with
count + 1 @Publishedstate triggers UI update- View re-renders with new count
Every interaction follows this exact same pattern. Predictable, traceable, and easy to debug.
Quick Tips for Your First MVI Setup
Keep intents pure — They should just describe what the user wants to do, not how to do it.
Make state immutable — Always create new state instances rather than modifying existing ones.
Handle async carefully — Always update state to show loading, then update again with results.
One store per feature — Don't try to put your entire app in one massive store.
Ready to see this pattern applied to something more realistic? Next, we'll build a complete Todo app that shows how MVI handles real-world complexity.
📱 Real-World Example: Todo App
Now let's build something more realistic — a Todo app that demonstrates how MVI handles complex state, async operations, and real user workflows. This is where MVI really starts to shine compared to simpler patterns.
Step 1: Define the Todo Models
First, let's set up our basic data models:
struct Todo: Identifiable, Codable, Equatable {
    let id: UUID
    var title: String
    var isCompleted: Bool
    let createdAt: Date

    init(title: String, isCompleted: Bool = false) {
        self.id = UUID()
        self.title = title
        self.isCompleted = isCompleted
        self.createdAt = Date()
    }

    // Custom init for decoding
    init(id: UUID, title: String, isCompleted: Bool, createdAt: Date) {
        self.id = id
        self.title = title
        self.isCompleted = isCompleted
        self.createdAt = createdAt
    }
}

enum TodoFilter: CaseIterable {
    case all, active, completed

    var title: String {
        switch self {
        case .all: return "All"
        case .active: return "Active"
        case .completed: return "Completed"
        }
    }
}
Step 2: Design the Complete State
Here's where MVI gets interesting. We need to think about every possible state our Todo feature can be in:
struct TodoState {
    // Core data
    var todos: [Todo] = []
    var newTodoText: String = ""
    var currentFilter: TodoFilter = .all

    // UI states
    var isLoading: Bool = false
    var isAddingTodo: Bool = false

    // Editing state
    var editingTodoId: UUID? = nil
    var editingText: String = ""

    // Computed properties for derived state
    var filteredTodos: [Todo] {
        switch currentFilter {
        case .all:
            return todos
        case .active:
            return todos.filter { !$0.isCompleted }
        case .completed:
            return todos.filter { $0.isCompleted }
        }
    }

    var canAddTodo: Bool {
        !newTodoText.trimmingCharacters(in: .whitespacesAndNewlines).isEmpty && !isAddingTodo
    }

    var activeTodoCount: Int {
        todos.filter { !$0.isCompleted }.count
    }

    var completedTodoCount: Int {
        todos.filter { $0.isCompleted }.count
    }

    var isEmpty: Bool {
        todos.isEmpty
    }
}

// Helper for immutable updates
extension TodoState {
    func copy(
        todos: [Todo]? = nil,
        newTodoText: String? = nil,
        currentFilter: TodoFilter? = nil,
        isLoading: Bool? = nil,
        isAddingTodo: Bool? = nil,
        editingTodoId: UUID? = nil,
        editingText: String? = nil
    ) -> TodoState {
        var newState = self
        if let todos = todos { newState.todos = todos }
        if let newTodoText = newTodoText { newState.newTodoText = newTodoText }
        if let currentFilter = currentFilter { newState.currentFilter = currentFilter }
        if let isLoading = isLoading { newState.isLoading = isLoading }
        if let isAddingTodo = isAddingTodo { newState.isAddingTodo = isAddingTodo }
        if let editingTodoId = editingTodoId { newState.editingTodoId = editingTodoId }
        if let editingText = editingText { newState.editingText = editingText }
        return newState
    }
}
Notice how we're thinking about everything — loading states, editing states, even an empty state. This is the beauty of MVI — you're forced to think about all possible states upfront.
Step 3: Define All Possible Intents
Now let's map out every single thing a user can do:
enum TodoIntent {
    // Loading and data management
    case loadTodos
    case refreshTodos

    // Adding todos
    case updateNewTodoText(String)
    case addTodo

    // Todo operations
    case toggleTodo(UUID)
    case deleteTodo(UUID)
    case clearCompleted

    // Editing
    case startEditing(UUID)
    case updateEditingText(String)
    case saveEdit
    case cancelEdit

    // Filtering
    case changeFilter(TodoFilter)
}
This is like a contract — if it's not in this enum, your app can't do it. No surprise features or hidden state changes.
Step 4: Create the Storage Service
Here's our simple AppStorage-based service that starts with an empty list:
@MainActor
class TodoService {
    static let shared = TodoService()
    private init() {}

    @AppStorage("todos_data") private var todosData: Data = Data()

    private var todos: [Todo] {
        get {
            guard !todosData.isEmpty else {
                return [] // Start with empty list
            }

            do {
                return try JSONDecoder().decode([Todo].self, from: todosData)
            } catch {
                print("Failed to decode todos: \(error)")
                return []
            }
        }
        set {
            do {
                todosData = try JSONEncoder().encode(newValue)
            } catch {
                print("Failed to encode todos: \(error)")
            }
        }
    }

    func loadTodos() async -> [Todo] {
        // Small delay to show loading state in UI
        try? await Task.sleep(nanoseconds: 100_000_000) // 0.1 seconds
        return todos
    }

    func addTodo(_ todo: Todo) async -> Todo {
        var currentTodos = todos
        currentTodos.append(todo)
        todos = currentTodos
        return todo
    }

    func updateTodo(_ todo: Todo) async -> Todo {
        var currentTodos = todos
        if let index = currentTodos.firstIndex(where: { $0.id == todo.id }) {
            currentTodos[index] = todo
        }
        todos = currentTodos
        return todo
    }

    func deleteTodo(id: UUID) async {
        var currentTodos = todos
        currentTodos.removeAll { $0.id == id }
        todos = currentTodos
    }

    func clearCompleted() async {
        var currentTodos = todos
        currentTodos.removeAll { $0.isCompleted }
        todos = currentTodos
    }
}
Perfect! Now if you delete all todos, they stay deleted. No fake data coming back to haunt you.
Step 5: Implement the Todo Store
Here's where all the magic happens. This store handles every intent and manages all state transitions:
@MainActor
final class TodoStore: MVIStore {
    @Published private(set) var state = TodoState()
    private let todoService = TodoService.shared

    // MARK: - Binding Properties
    var newTodoTextBinding: Binding<String> {
        Binding(
            get: { self.state.newTodoText },
            set: { self.send(.updateNewTodoText($0)) }
        )
    }

    var filterBinding: Binding<TodoFilter> {
        Binding(
            get: { self.state.currentFilter },
            set: { self.send(.changeFilter($0)) }
        )
    }

    var editingTextBinding: Binding<String> {
        Binding(
            get: { self.state.editingText },
            set: { self.send(.updateEditingText($0)) }
        )
    }

    func send(_ intent: TodoIntent) {
        switch intent {
        case .loadTodos:
            handleLoadTodos()
        case .refreshTodos:
            handleRefreshTodos()
        case .updateNewTodoText(let text):
            handleUpdateNewTodoText(text)
        case .addTodo:
            handleAddTodo()
        case .toggleTodo(let id):
            handleToggleTodo(id)
        case .deleteTodo(let id):
            handleDeleteTodo(id)
        case .clearCompleted:
            handleClearCompleted()
        case .startEditing(let id):
            handleStartEditing(id)
        case .updateEditingText(let text):
            handleUpdateEditingText(text)
        case .saveEdit:
            handleSaveEdit()
        case .cancelEdit:
            handleCancelEdit()
        case .changeFilter(let filter):
            handleChangeFilter(filter)
        }
    }

    // MARK: - Loading and Data Management

    private func handleLoadTodos() {
        guard !state.isLoading else { return }

        state = state.copy(isLoading: true)

        Task { @MainActor in
            let todos = await todoService.loadTodos()
            state = state.copy(todos: todos, isLoading: false)
        }
    }

    private func handleRefreshTodos() {
        Task { @MainActor in
            let todos = await todoService.loadTodos()
            state = state.copy(todos: todos)
        }
    }

    // MARK: - Adding Todos

    private func handleUpdateNewTodoText(_ text: String) {
        state = state.copy(newTodoText: text)
    }

    private func handleAddTodo() {
        guard state.canAddTodo else { return }

        let todoText = state.newTodoText.trimmingCharacters(in: .whitespacesAndNewlines)
        let newTodo = Todo(title: todoText)

        state = state.copy(isAddingTodo: true)

        Task { @MainActor in
            let addedTodo = await todoService.addTodo(newTodo)
            var updatedTodos = state.todos
            updatedTodos.append(addedTodo)

            state = state.copy(
                todos: updatedTodos,
                newTodoText: "",
                isAddingTodo: false
            )
        }
    }

    // MARK: - Todo Operations

    private func handleToggleTodo(_ id: UUID) {
        guard let todoIndex = state.todos.firstIndex(where: { $0.id == id }) else { return }

        var updatedTodo = state.todos[todoIndex]
        updatedTodo.isCompleted.toggle()

        var updatedTodos = state.todos
        updatedTodos[todoIndex] = updatedTodo

        // Update UI immediately
        state = state.copy(todos: updatedTodos)

        Task { @MainActor in
            _ = await todoService.updateTodo(updatedTodo)
        }
    }

    private func handleDeleteTodo(_ id: UUID) {
        let updatedTodos = state.todos.filter { $0.id != id }

        // Update UI immediately
        state = state.copy(todos: updatedTodos)

        Task { @MainActor in
            await todoService.deleteTodo(id: id)
        }
    }

    private func handleClearCompleted() {
        Task { @MainActor in
            await todoService.clearCompleted()
            let todos = await todoService.loadTodos()
            state = state.copy(todos: todos)
        }
    }

    // MARK: - Editing

    private func handleStartEditing(_ id: UUID) {
        guard let todo = state.todos.first(where: { $0.id == id }) else { return }
        state = state.copy(editingTodoId: id, editingText: todo.title)
    }

    private func handleUpdateEditingText(_ text: String) {
        state = state.copy(editingText: text)
    }

    private func handleSaveEdit() {
        guard let editingId = state.editingTodoId,
              let todoIndex = state.todos.firstIndex(where: { $0.id == editingId }) else { return }

        var updatedTodo = state.todos[todoIndex]
        updatedTodo.title = state.editingText.trimmingCharacters(in: .whitespacesAndNewlines)

        var updatedTodos = state.todos
        updatedTodos[todoIndex] = updatedTodo

        state = state.copy(
            todos: updatedTodos,
            editingTodoId: nil,
            editingText: ""
        )

        Task { @MainActor in
            _ = await todoService.updateTodo(updatedTodo)
        }
    }

    private func handleCancelEdit() {
        state = state.copy(editingTodoId: nil, editingText: "")
    }

    // MARK: - Filtering

    private func handleChangeFilter(_ filter: TodoFilter) {
        state = state.copy(currentFilter: filter)
    }
}
Look at how each intent handler is focused on one specific thing. The async operations update the UI immediately for great user experience, then persist the changes in the background.
This setup is clean, predictable, and your data persists perfectly between app launches. No fake data surprises!
Step 6: Build the SwiftUI Views
Here's how our MVI architecture comes together in the UI. Notice how clean and focused each view becomes:
struct TodoListView: View {
    @StateObject private var store = TodoStore()

    var body: some View {
        NavigationView {
            VStack {
                if store.state.isLoading {
                    loadingView
                } else if store.state.isEmpty {
                    emptyStateView
                } else {
                    todoContent
                }
            }
            .navigationTitle("My Todos")
            .toolbar {
                ToolbarItem(placement: .navigationBarTrailing) {
                    if store.state.completedTodoCount > 0 {
                        Button("Clear Completed") {
                            store.send(.clearCompleted)
                        }
                    }
                }
            }
            .onAppear {
                store.send(.loadTodos)
            }
        }
    }

    private var loadingView: some View {
        VStack {
            ProgressView()
            Text("Loading todos...")
                .foregroundColor(.secondary)
        }
    }

    private var emptyStateView: some View {
        VStack(spacing: 20) {
            Image(systemName: "checkmark.circle")
                .font(.largeTitle)
                .foregroundColor(.secondary)

            Text("No todos yet")
                .font(.headline)

            Text("Add your first todo below to get started!")
                .foregroundColor(.secondary)
                .multilineTextAlignment(.center)

            addTodoSection
        }
        .padding()
    }

    private var todoContent: some View {
        VStack {
            filterSection
            todoList
            addTodoSection
            statsSection
        }
    }

    private var filterSection: some View {
        Picker("Filter", selection: store.filterBinding) {
            ForEach(TodoFilter.allCases, id: \.self) { filter in
                Text(filter.title).tag(filter)
            }
        }
        .pickerStyle(.segmented)
        .padding(.horizontal)
    }

    private var todoList: some View {
        List {
            ForEach(store.state.filteredTodos) { todo in
                TodoRowView(
                    todo: todo,
                    isEditing: store.state.editingTodoId == todo.id,
                    editingTextBinding: store.editingTextBinding,
                    onToggle: { store.send(.toggleTodo(todo.id)) },
                    onDelete: { store.send(.deleteTodo(todo.id)) },
                    onStartEdit: { store.send(.startEditing(todo.id)) },
                    onSaveEdit: { store.send(.saveEdit) },
                    onCancelEdit: { store.send(.cancelEdit) }
                )
            }
        }
        .refreshable {
            store.send(.refreshTodos)
        }
    }

    private var addTodoSection: some View {
        HStack {
            TextField("What needs to be done?", text: store.newTodoTextBinding)
                .textFieldStyle(.roundedBorder)
                .onSubmit {
                    if store.state.canAddTodo {
                        store.send(.addTodo)
                    }
                }

            Button(action: { store.send(.addTodo) }) {
                if store.state.isAddingTodo {
                    ProgressView()
                        .scaleEffect(0.8)
                } else {
                    Image(systemName: "plus.circle.fill")
                        .font(.title2)
                }
            }
            .disabled(!store.state.canAddTodo)
        }
        .padding()
    }

    private var statsSection: some View {
        HStack {
            Text("\(store.state.activeTodoCount) active")
            Spacer()
            Text("\(store.state.completedTodoCount) completed")
        }
        .font(.caption)
        .foregroundColor(.secondary)
        .padding(.horizontal)
    }
}
Now here's the individual todo row component:
struct TodoRowView: View {
    let todo: Todo
    let isEditing: Bool
    let editingTextBinding: Binding<String>

    let onToggle: () -> Void
    let onDelete: () -> Void
    let onStartEdit: () -> Void
    let onSaveEdit: () -> Void
    let onCancelEdit: () -> Void

    var body: some View {
        HStack {
            // Completion toggle
            Button(action: onToggle) {
                Image(systemName: todo.isCompleted ? "checkmark.circle.fill" : "circle")
                    .foregroundColor(todo.isCompleted ? .green : .gray)
                    .font(.title2)
            }
            .buttonStyle(.plain)

            // Todo content
            if isEditing {
                editingView
            } else {
                displayView
            }
        }
        .padding(.vertical, 4)
        .swipeActions(edge: .trailing, allowsFullSwipe: true) {
            Button("Delete", role: .destructive, action: onDelete)
        }
        .swipeActions(edge: .leading) {
            Button("Edit", action: onStartEdit)
                .tint(.blue)
        }
    }

    private var displayView: some View {
        HStack {
            VStack(alignment: .leading, spacing: 2) {
                Text(todo.title)
                    .strikethrough(todo.isCompleted)
                    .foregroundColor(todo.isCompleted ? .secondary : .primary)

                Text(todo.createdAt, style: .date)
                    .font(.caption2)
                    .foregroundColor(.secondary)
            }

            Spacer()
        }
        .contentShape(Rectangle())
        .onTapGesture {
            onStartEdit()
        }
    }

    private var editingView: some View {
        HStack {
            TextField("Todo title", text: editingTextBinding)
                .textFieldStyle(.roundedBorder)
                .onSubmit(onSaveEdit)

            Button("Save", action: onSaveEdit)
                .buttonStyle(.borderedProminent)
                .controlSize(.small)

            Button("Cancel", action: onCancelEdit)
                .buttonStyle(.bordered)
                .controlSize(.small)
        }
    }
}
What Makes This MVI?
Look at what's happening in these views:
1. Pure Presentation — Views only display state and send intents. No business logic.
2. Single Source of Truth — Everything the UI needs comes from store.state.
3. Unidirectional Flow — User interactions become intents that flow through the store.
4. Predictable Updates — Every state change is traceable through the intent system.
The view doesn't know or care how todos are stored, how they're filtered, or what happens when you toggle completion. It just sends intents and displays state.
📊 When to Use MVI vs Other Patterns
Alright, let's be honest here. MVI isn't a silver bullet, and I've seen teams adopt it just because it sounds fancy, only to regret it later. So when should you actually use MVI?
When MVI Shines ✨
Complex State Management If you're dealing with screens that have multiple data sources, real-time updates, and intricate state dependencies, MVI is your friend. Think of a dashboard with filters, live data, user preferences, and multiple async operations happening simultaneously.
Team Collaboration MVI really shines when you have multiple developers working on the same features. The explicit intent system makes it crystal clear what each feature can do, and the unidirectional flow makes debugging much easier when someone else's code breaks.
Predictable User Flows Apps with complex user workflows — like e-commerce checkouts, multi-step forms, or wizard-like interfaces — benefit massively from MVI's predictable state transitions.
Heavy Testing Requirements If you need comprehensive testing (think fintech, healthcare, or enterprise apps), MVI's separation of concerns makes unit testing a breeze. Every intent can be tested in isolation.
When MVI Might Be Overkill 🎯
Simple CRUD Apps If you're building a straightforward app with basic list views, simple forms, and minimal state interactions, MVI adds unnecessary complexity. MVVM or even plain SwiftUI with @State might be more appropriate.
Prototype or MVP Development When you need to move fast and prove concepts quickly, MVI's upfront architectural investment might slow you down. Start simple, refactor later if needed.
Small Teams or Solo Development If it's just you or a very small team, the communication benefits of explicit intents might not outweigh the additional boilerplate.
MVI vs MVVM: The Real Talk 🤔
MVVM is better when:
- You want faster development cycles
- Your app has straightforward data flows
- You're comfortable with SwiftUI's binding patterns
- Your team is already productive with MVVM
MVI is better when:
- You need predictable, traceable state changes
- Multiple developers work on complex features
- You have intricate async operations and side effects
- Testing and maintainability are top priorities
The Migration Path 🛤️
Here's what I've learned from real projects: you don't have to go all-in immediately.
Start with MVI for your most complex screens — the ones that give you headaches in MVVM. Keep simpler screens in MVVM. As your team gets comfortable with the pattern, gradually migrate more features.
This hybrid approach lets you get the benefits where you need them most without rewriting your entire app.
Making the Decision 🎭
Ask yourself these questions:
- Do I spend significant time debugging state issues? If yes, MVI might help.
- Are multiple developers touching the same complex features? MVI's explicit contracts reduce conflicts.
- Do I have complex async workflows with multiple interdependent operations? MVI handles this elegantly.
- Is my current architecture making testing difficult? MVI's separation makes testing much easier.
- Am I building for long-term maintainability? MVI pays dividends over time.
If you answered "yes" to 3 or more, MVI is probably worth the investment.
The Bottom Line 📝
MVI isn't about being trendy or following the latest architectural fad. It's a tool that solves specific problems around predictable state management and complex user interactions.
Use it when those problems exist, skip it when they don't. Your future self (and your teammates) will thank you for making the pragmatic choice rather than the fashionable one.
The best architecture is the one that helps your team ship quality software efficiently. Sometimes that's MVI, sometimes it's not. And that's perfectly fine.
🎉 Enjoyed this article? Your support means the world to me!
👏 Give it some claps if it helped you out — it really helps other developers discover this content
💬 Drop a comment below! I love hearing about your experiences and answering questions
🎬 Subscribe on Youtube and become early subscribers of my channel: https://www.youtube.com/@swift-pal
🐦 Follow me on Twitter for daily SwiftUI tips and tricks: https://twitter.com/swift_karan
💼 Let's connect on LinkedIn for more professional insights: https://www.linkedin.com/in/karan-pal
📬 Subscribe to my Medium so you never miss my latest deep dives: https://medium.com/@karan.pal/subscribe
☕ Buy me a coffee if this saved you some debugging time (seriously, your support keeps me writing!): https://coff.ee/karanpaledx
Happy coding! 🚀